Having a powerful tool like HubSpot can be great but it can be difficult to know where to start with such a great tool at your fingertips. HubSpot has a great automation feature called ‘Workflows’. You can build all sorts of automated processes based on different triggers to help you automate your marketing operations.
In this article we will talk about some of the most common use cases of workflows for B2B marketing automation. We are focusing on email drip campaigns in these workflows as they are very useful.
How to setup a basic HubSpot workflow
Here's the step-by-step approach to setting up an onboarding workflow for your B2B SaaS marketing company using HubSpot, with each step as a new section. This workflow can guide new customers through the onboarding process, offering tutorials, tips, and product usage guides to ensure they get the most out of your software.
Step 1: Define Your Onboarding Goals
Firstly you should determine the specific outcomes you want to achieve through your onboarding workflow. This could include increased product adoption, reduced churn, or improved customer satisfaction. Think about what events or actions you want customers to take.
Step 2: Segment Your Customers
Divide your customers into segments based on their needs, preferences, or the features they use. This segmentation will allow you to tailor your onboarding workflow for different customer groups. For example you may have a different workflow for different tiers or customers or verticals.
Step 3: Identify Key Onboarding Touch-points
Map out the critical touch-points in the customer's onboarding journey. These could include welcome emails, tutorials, product demos, or access to support resources.
Step 4: Create Onboarding Content
Develop content that will be delivered at each touchpoint. This content can include videos, guides, FAQs, and any other resources that help customers get started with your SaaS product.
Step 5: Set Up HubSpot Workflow
In your HubSpot account, navigate to the Workflow tool. Click "Create workflow" and choose "Start from scratch." Name your workflow (e.g., "Onboarding Workflow") and select the type (e.g., "Marketing" or "Lead nurturing").
Step 6: Define Enrollment Triggers
Determine the conditions that will trigger enrollment in the onboarding workflow. This might be when a new customer signs up or when an existing customer activates a specific feature.
Step 7: Add Workflow Actions
Build the workflow by adding actions at each stage. These actions could include sending welcome emails, scheduling product demos, or assigning tasks to your support team.
Step 8: Personalize and Segment
Use HubSpot's personalization features to tailor messages to each customer segment. You can use contact properties and list memberships to segment your audience within the workflow.
Step 9: Set Delays and Timing
Configure delays between actions to ensure that the onboarding process unfolds at an appropriate pace. For example, you might want to send a follow-up email a day after the welcome email.
Step 10: Test and Optimize
Before launching the workflow, test it with a small group of customers to ensure everything works as intended. Monitor its performance and make adjustments based on user engagement and feedback.
Step 11: Launch the Workflow
Once you're satisfied with the workflow's performance, activate it for all relevant customers.
Step 12: Monitor and Analyze
Continuously monitor the performance of your onboarding workflow. HubSpot provides analytics to track email open rates, click-through rates, and conversion rates.
Step 13: Iterate and Improve
Based on data and feedback, make iterative improvements to your onboarding workflow. HubSpot's A/B testing capabilities can help you refine your messaging and timing.
Step 14: Scale and Expand
As your SaaS company grows and offers new features, consider expanding and customizing your onboarding workflows to cater to different customer segments and needs.
Remember that onboarding is an ongoing process, and your workflow should evolve to meet changing customer requirements and product updates. HubSpot's automation capabilities can help you streamline this process while providing a personalized experience for your customers.
Using and tweaking this framework
The template and step-by-step process outlined above is fairly generic which means you use the same framework to build workflows for other scenarios such as free trial sign-ups, content downloads and event follow-up. For a free trial sign-up you will have different touchpoints, triggers and content. We’ve added some notes below on tweaks or adjustments you may want to make yourself.
Enrollment Triggers
Depending on the workflow you are going to have different enrollment triggers for each workflow. Below are some of the common enrollment triggers for the different workflows. Submitting a form on your website is a common trigger for a HubSpot Workflow, but be careful not to create too many overlapping workflows because people can end up with lots of different emails.
Common workflow triggers:
- Signed-up for a free trial
- Is a member of a list (event attendees as an example)
- Became a paying customer
- Downloaded a piece of content
Free-trial Workflow Actions
Typically the objective of a free-trial workflow is to improve the conversion from free-trial to paying customer. This means the automated workflow would typically contain a number of emails designed to check in at certain points during the trial.
If you can, it is worth integrating your SaaS product directly into HubSpot so that you can use analytic events from the app to trigger actions in a workflow. For example, if someone used a certain feature that would trigger an event, this event could be used to measure adoption within a free trial and therefore send a different email based on objectives being met.
We recommend that your free-trial workflow highlights the features of the product the user has yet to use, this is why it is useful to integrate your software directly with HubSpot.
Delays and timing of workflow actions
One thing you should consider when setting up automated actions is the timing of these actions. For example you may not want to send an email as soon as someone triggers it, that can be a little reactive. We suggest adding in delays where possible to ensure you are not spamming your contacts.
Lead Nurturing Workflows
Lead nurturing workflows are probably the most common workflows used in HubSpot. These workflows are typically triggered when someone downloads a piece of content on your website. This could be a guide or some form template.
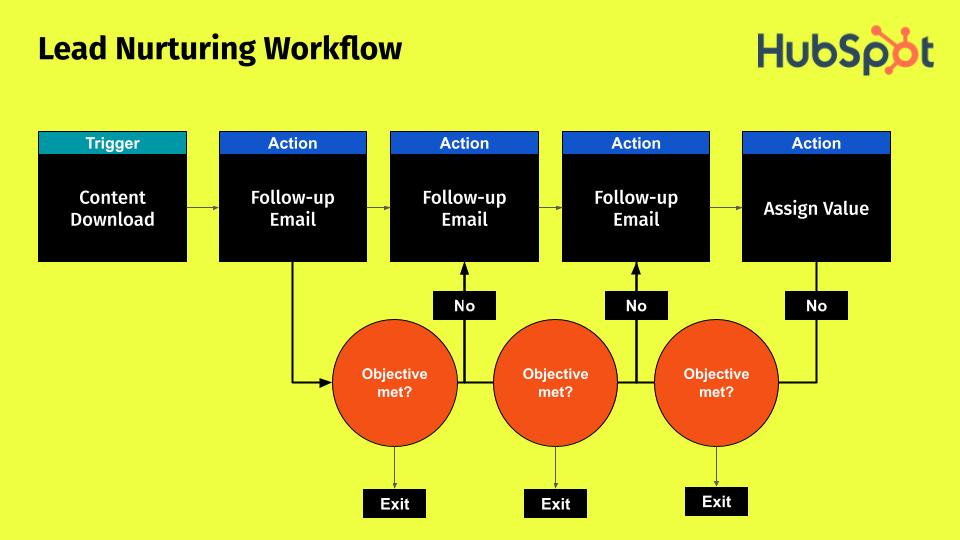
Below is an example of how a typical lead nurturing workflow may look. The objective of the workflow would be to get them to take the next action in the buyer journey, so that may be booking a call or signing up for a trial. At each stage you check if the object has been met, and if not you continue.
We recommend when you set up these sorts of workflows that you have only one master workflow for all content downloads and that it is personalized based on the content they download. This is because if you create a workflow for each piece of content it can become hard to manage in the long-run and you end up with lots of overlapping emails.

The objective of a nurture workflow is to provide the user with more useful content and to stay top of mind so that when they are ready to buy they think of you because you have been ‘nurturing’ their relationship with your brand.
The benefit of this approach is that you will have built up authority and trust with the user because you have been providing them with useful and relevant content.
More tips for HubSpot Workflows
One of the best tips we can provide you with regarding HubSpot workflows is that you should try and keep them simple and compartmentalised.
This is because if you build a workflow with many steps and lots of variables it can be difficult to maintain and edit moving forward. It can also be difficult for a third party to review.

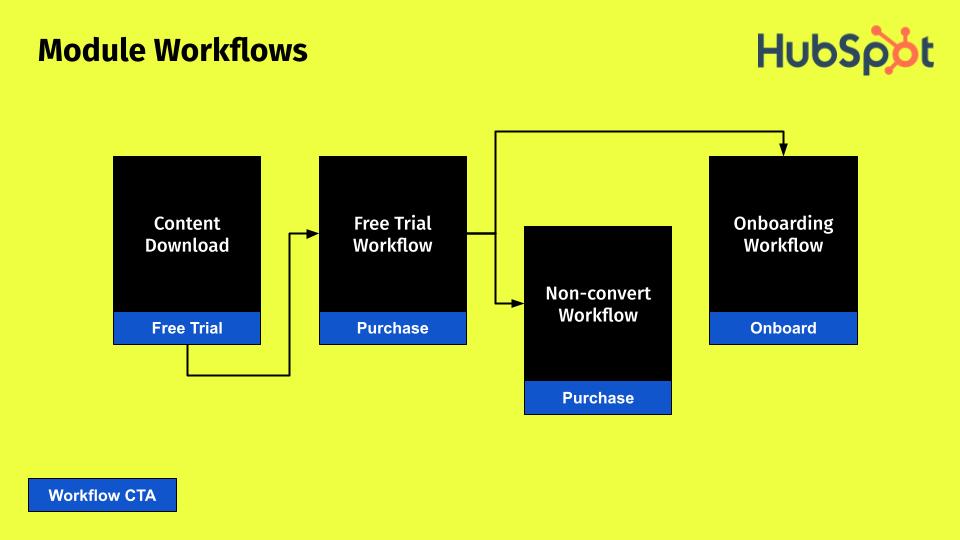
The best approach to HubSpot workflows is to keep them Bitesize with no more than 5 steps. If you need to add more steps we recommend starting a new workflow.
This way you create a chain of bitesize workflows that can be easily edited in isolation. It also means that you can connect multiple workflows to one another and use them as triggers.
Workflows are only one element
Remember when designing workflows, especially lead nurturing ones, they are only one part of the puzzle. You have many other tools at your disposal including ads to help reach customers that have already interacted with you in some way.
CRM Date Management With Workflows
Another great use case for workflows is to manipulate and manage your CRM data. You can do this automatically assigning values to contacts and companies based on certain conditions. For example you may want to fill in a field called 'Job Role' based on the data in a 'Job Title' field. You may also want to assign a certain targeting segment to a company based on their size or location. The options are endless really.
One example we have seen used to success to set a field called 'First Conversion Type' on a contact record based on the data collected in the 'First Conversion Field'. This is a useful way of grouping similar actions into one segment and it means you don't have to do it manually. We actually wrote another article here about putting this into practice.
Summary
HubSpot Workflows are really powerful. You can easily save time and increase the efficiency of your marketing operations using them. Just remember to keep the small and like modules that you can connect together to form a more complex functionality. This is how software is actually built, lots of small functions and processes connected together! So in a way you are being Sassy by doing this.
Find a B2B SaaS Expert
We've collected a directory of B2B SaaS experts and agencies that we've reviewed and categorised based on service and specialism for your review.


